🚀 Intro
I designed and developed a custom fullstack web application for my friend's up-and-coming business. I have known her for quite some time, and her love and passion for matcha was my central inspiration.
I had the opportunity to expand her vision and online presence with a functional webpage that is public and equally as shareable and presentable as an Instagram profile link.
Currently, I collaborate with her to extend design workflows and upcoming business goals with Square APIs and SDKs. The website has the following architecture:
- Next.js: frontend and backend; handles both client-side and server-side logic
- Prisma: connect backend to a Postgres database
- Set up for Payload CMS integration
- Set up for Jest Testing and Cypress (end-to-end) Testing
Version 3.0 of the firstsipmatcha website has an ecommerce integration utilizing Square Checkout API for payments. User sessions are maintained via cookie-based authentication and stored in an external database.
Check out the previous write-up: Website for a Small Business (Front-End version) to see the early development stages of the application. I discuss the initial designs built with Figma, transition to basic HTML, CSS and JS, and git push updates that detail the migration to React.js and then Next.js using TypeScript.
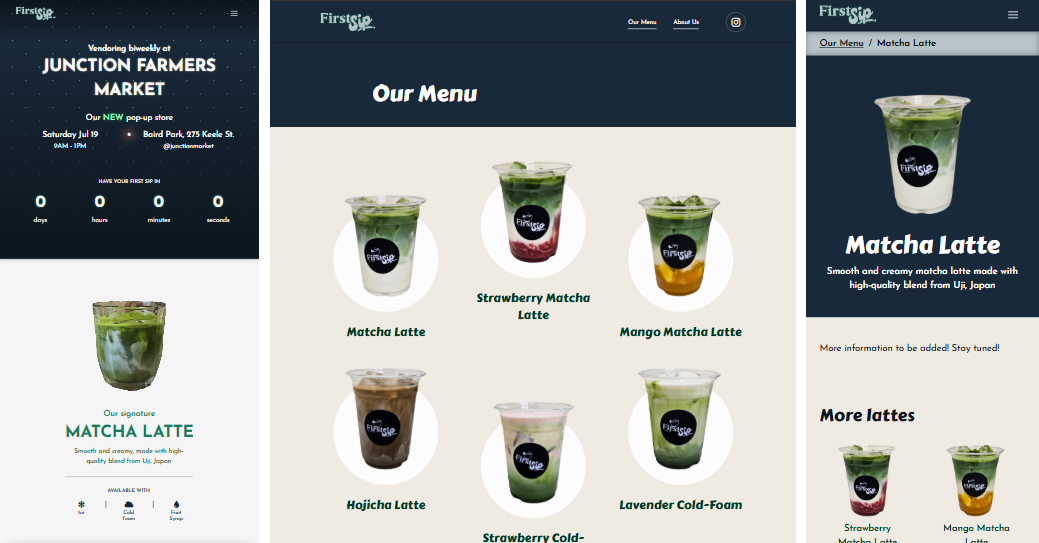
- Left: homepage on smaller devices
- Middle: /menu page on larger devices
- Right: /menu/matcha-latte page on smaller devices
🏆 Goals
The goal was to create a tailored solution that effectively showcased the brand's identity. The website needed to complement the existing Instagram profile while being engaging and responsive across various devices to maintain cross-device compatibility. Moreover, the design had to be scalable to accommodate future web features, pages and functionalities.
What motivated me was the challenge of successfully combining creative design elements with the technical aspects to support and aid in business growth.
To accommodate growing business goals, I wanted to build a small backend so the web application can communicate with a database, and utilize Square Checkout API for checkouts, processing payments and order fulfillments.
⏳ TypeScript (Next.js)
What makes for a successful online presence in the food and drink industry?
That was the question I asked when first starting out. Be sure to check out the previous write-up: Website for a Small Business (Front-End version).
In December 2024, I migrated from basic HTML/CSS/JS to ReactJS, a popular frontend JS framework. Building with a react allowed for improved workflow due to its advantages with dynamic content. It was easier to maintain, build and scale component-based code, and I became proficient with translating Figma designs into rendered user interfaces.
Throughout your reading journey, I will include buttons to reveal some supplementary information. These only provide additional information and are not mandatory, but I highly recommend reading them!
Specifically, I learned about the lifecycle of a react component versus an effect, react states and hooks, and the overall concept of a single-page application (SPA).
It was a lot of fun learning and building with react due to the ease of file-based routing, responsiveness and user interactivity.
I also learned the differences in how a webpage is rendered. The usage of states and hooks is primarily client-side rendering (CSR), where rendering happens on the browser. Later, I will dive into prerendering.
React was beneficial for me to examine the different JavaScript frameworks, and how powerful they can be.
Performance and accessibility implementations became more intuitive. For example, I built a hamburger menu button for mobile navigation via this LogRocket blog post by Ibadehin Mojeed. The mobile navigation modal along with the button will have different styling and ARIA attributes based on the device size. Various styling choices also applied to every responsive design because of the ease of making UI changes based on the browser client.
With BrowserRouter and Routes, I performed some routing/paths proofing, like redirects, 'Not Found' pages and catch-all routing. However, a major drawback was that a react router application does not go harmoniously together with GitHub Pages since GitHub Pages does not support single-page applications (SPA). To keep all my projects available and functional on GitHub, I used this solution by rafgraph. At this point, I knew that react was not going to be where I stopped when it came to building web applications.
Thinking ahead, I built a mock SQL database by moving all information about the beverage menu into its own json file. Each item belongs under a specific category of drinks and has relevant tags for easy look-up and filtering.
Then, I made improvements to the landing/home page. To showcase multiple announcements or news-like content, I built a carousel in the hero section such that users can view these information pieces in a circular rotation. To improve the user experience, I made the carousel infinite in both backward and forward directions, adjusted responsive behaviour at the pre-established breakpoints, added a pagination (visual indication of the number of information pieces/slides), and prevented the backward and forward buttons to fire again too quickly after a previous interaction.
I also made design improvements to the menu page, the page listing all items on the menu. To prepare for individual item pages and to declutter the interface, I removed the description attached to each item, and enlargened the image and the font size of the item name. To enhance the visual design, I added a white oval shape behind the entire item to better convey the size of the interactive HTML element, and increased the distance between the image and the item name.

Right: current deployed design with updated images
In July 2025, I launched version 2.0 built with TypeScript and Next.js. I learned next after researching about deploying production-ready web applications. Moreover, typescript and next provided additional mechanisms for accessibility and improved SEO like prefetching content and prerendered pages. Next web applications hosted with GitHub pages functioned better compared to react due to its file-based routing system. This system allowed the ease of building dynamic pages, for example: individual pages for each menu item.
Now, it was more intuitive to define client components with client-side rendering (CSR) versus components that can be prerendered. For example, server-side render (SSR), and static site generation (SSG).
For the aforementioned dynamic pages, I implemented static dynamic route segments using generateStaticParams(). I extended the menu json database to include a unique id attribute per menu item. For example, "Matcha Latte" has id: matcha-latte.
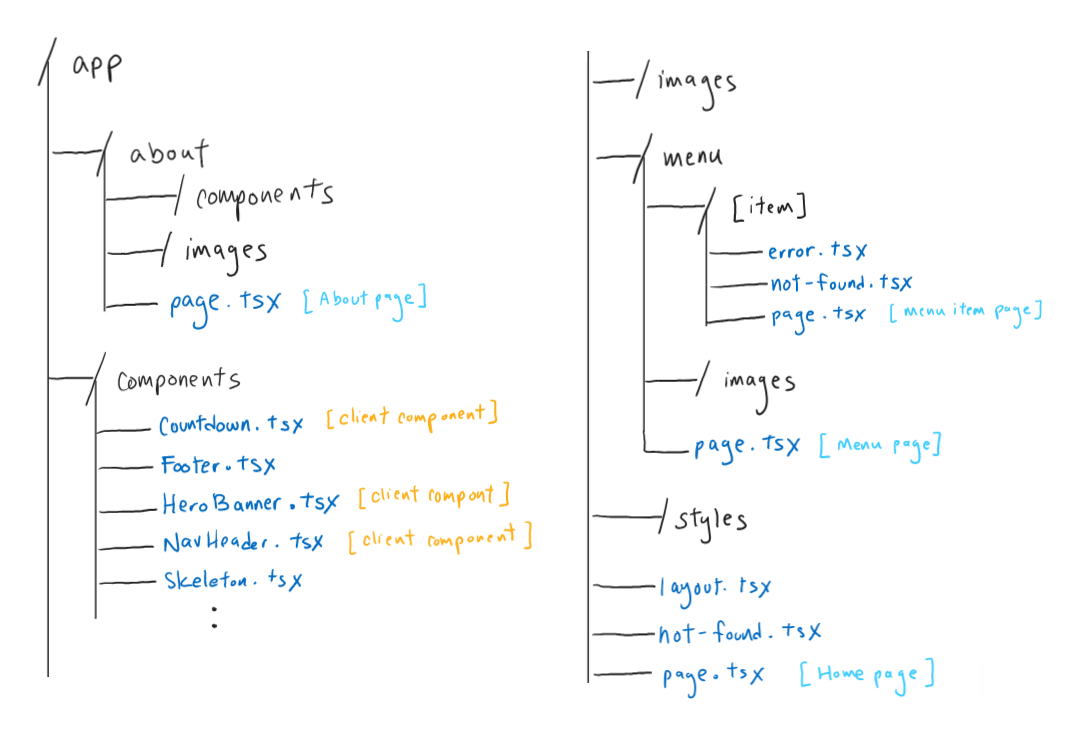
Each menu item has a specific page design/layout located at /menu/<itemId>. The main information of the item is located at the top of the page, which includes a display image, the item name as the <h1> heading, and the item description. There is also a breadcrumbs component that serves as the secondary navigation. The rest of the page contains the information specific to the item, which is still currently under development. Lastly, there is a tertiary navigation under a "related items" section. For example, under the "Matcha Latte" page, there is a section with the heading "More lattes" and a small list of other latte items.
Furthermore, the routing system allowed for boundary navigation cases. I created not-found.tsx as a custom page not found, and error.tsx as a custom general fallback error page. For example, if the user navigated to a menu item that does not exist (e.g. /menu/latte, /menu/abcd), the user is navigated to /menu/not-found where there is an option to go back to the menu page at /menu. For any other invalid navigations (e.g. /menu123, /aboutabout, /asdf), the user is navigated to /not-found.
After, I worked on Lighthouse performance score enhancements.
- Used
next's Image components, added thepriorityattribute, and reduced image sizes for improved performance - Implemented ARIA attributes for improved accessibility
- On the hamburger menu button:
aria-hidden="true"anddisabledon larger device sizesaria-label="Open menu"andaria-expanded="false"by defaultaria-label="Close menu"andaria-expanded="true"when the menu mobile navigation modal is openaria-controls="primary-hamburger-nav-menu"
- On the navigation modal:
id="primary-hamburger-nav-menu"andaria-modal="true" - On the
SVGlogo that links to the home page:aria-label="Home, First Sip Matcha Bar" - On the home page carousel,
- On the carousel container:
aria-roledescription="carousel" - On individual slides:
aria-label={`${index + 1} of ${list.length}`}andaria-roledescription="slide"
- On the carousel container:
- On the hamburger menu button:
- Added
role="presentation"on decorative images - Added
metadescriptions, screen-reader only text in the<a>elements without descriptive text, and adjustedCSSvalues for improved SEO
📈 Full Stack with Next.js (ft. Angular)
As a solo developer, I needed to master the backend as well.
Angular was another popular framework that I wanted to try. Since I already built the typescript version, the learning curve was manageable as I did not have to worry about the frontend. I found a full stack ecommerce application walkthrough using Angular, Nest.js and GraphQL on YouTube, and transformed the example project to suit mine.
- Nx monorepo to manage both frontend and backend inside one workspace
- Angular frontend framework
- Service and SignalStore injections for data sharing
- Nest.js backend
- Prisma ORM to connect backend to Postgres database
- Use
typescriptfunctions to interact with database - No
SQLqueries needed
- Use
- GraphQL to connect frontend to backend
- Apollo Client for Angular
- Set up for Jest Testing
First, I created a nx workspace, and added a nest backend application. Then, I integrated prisma and created a free Neon Postgres project database. With prisma, I defined a schema that modelled after the json files.
// schema.prisma
model Category { // define Category
    id              String      @id @default(uuid())
    name            String
    description     String?
    list            Item[]      // each category has a list of items
}

model Item { // define menu Item
    itemId          String      @id
    name            String
    description     String
    price           Float
    tags            String[]
    img             String
    catId           String      // each item belongs to a category
    Category        Category    @relation(fields: [catId], references: [id])
}

// TODO: define Tag object
After creating a script to populate the categories and items, I imported the ApolloDriver as a GraphQLModule. Then, I built the Item resource with nx g resource item/item in the console, and defined the Item entity.
Then, I modified the service and resolver files for Item for specific situations. For example, the client can search a particular item by item name or by the tag name.
// item.service.ts
@Injectable()
export class ItemsService {
    //...
    async searchItems(term: string): Promise { // 'term' param is the term to search in the database
        const lowercaseTerm = term.toLowerCase();
        return this.prisma.item.findMany({ // find all items that have 'term' in the name or description
            where: {
                OR: [
                    { name: { contains: lowercaseTerm, mode: 'insensitive' } },
                    { description: { contains: lowercaseTerm, mode: 'insensitive' } },
                ],
            },
        });
    }

    async searchTag(tag: string): Promise { // 'tag' param is the tag name to search in the database
        const lowercaseTerm = tag.toLowerCase();

        return this.prisma.item.findMany({ // find all items that have the specific tag
            where: {
                tags:{ has: lowercaseTerm }
            },
        });
    }
}
At this point, we can nx serve fsm-be on the console to run the backend and use the GraphQL Playground at localhost.
# GraphQL Playground
query GetItems { # get all items from the database
    items {
        itemId
        name
        description
        price
        tags
        img
        catId
    }
}

query SearchItems { # get all items from the database that have 'latte' in the name or description
    searchItems(term: "latte") {
        itemId
        name
        description
        price
        tags
        img
        catId
    }
}

query SearchTag { # get all items from the database that have a tag named 'latte'
    searchTag(tag: "latte") {
        itemId
        name
        description
        price
        tags
        img
        catId
    }
}
With the backend foundation, I added an angular frontend application. I enabled Tailwind CSS and SCSS, and configured the routing inside app.routes.ts.
Then, I translated all previously established typescript pages and components into angular code.
The menu page that shows all items will need graphql, so I built an injectable MenuService.
// menuItem.service.ts
const GET_ITEMS = gql`
    query GetItems {
        items {
        itemId
        name
        description
        price
        tags
        img
        catId
        }
    }
`;

//...

@Injectable({
    providedIn: 'root'
})
export class MenuService { // inject into component to access the service
    //...
    loadItems() {
        this.loading = true;
        this.error = null;
        this.apollo
        .query<{ items: Item[] }>({
            query: GET_ITEMS,
        })
        .pipe(
            map(({ data }) => {
            this.items = data.items;
            this.loading = false;
            }),
            catchError((error) => {
            this.error = error.message;
            this.loading = false;
            return EMPTY;
            })
        )
        .subscribe();
    }

    searchItems(term: string) { ... }

    searchTag(tag: string) { ... }
    // ...
}
// menu.ts
//...
export class Menu {
    menuItems = inject(MenuService);
    constructor() {
        this.menuItems.loadItems();
    }
}
<!-- menu.html -->
<!-- ... -->
<ul *ngIf="!menuItems.loading" class="menu-category-list">
    @for (item of menuItems.items; track item.itemId){ ... }
</ul>
<!-- ... -->
For the individual item pages, I added a specific path routing and injected the MenuService. The itemId is obtained from the route path and is used to get the specific Item object.
// app.routes.ts
{
    path: 'menu/:itemId',
    //...
}
// menu_item.ts, for example: /menu/matcha-latte
//...
export class MenuItem {
    //...
    item = inject(MenuService);

    constructor(private titleService: Title, private route: ActivatedRoute) {
        this.route.paramMap.subscribe((params) => {
            this.itemId = params.get('itemId'); // "matcha-latte"
            this.item.getItem(this.itemId); // get the item that has the itemId
            //...
        });
    }
}
The Angular tutorial served as a good lesson as to the different integrations used to build a full stack application. The tutorial also featured session management with customer data like login and list of orders.
As this was a simple demonstration project, I believed user login was not needed at this stage. However, I thought the ability for non-developers to be able to contribute to the web application was a valuable aspect.
I researched into content management systems (CMS) and found Payload, an open-source Next.js native CMS. A CMS would allow users without coding experience to create, manage, and publish digital content for a digital platform.
💻 "Backend for Frontend"
I continued with next, as I could integrate Payload CMS later on, and committed to building a backend with Next.js. To integrate ecommerce into the website, I created a mock shopping system where users can view and add products to a shopping cart, and fulfil checkouts with Square.
- Server Actions: execute asynchronous functions on the server (e.g. fetching/mutating data, form submissions)
- Route Handlers: handle requests using HTTP methods
- Middleware: execute custom server-side logic before routes are rendered
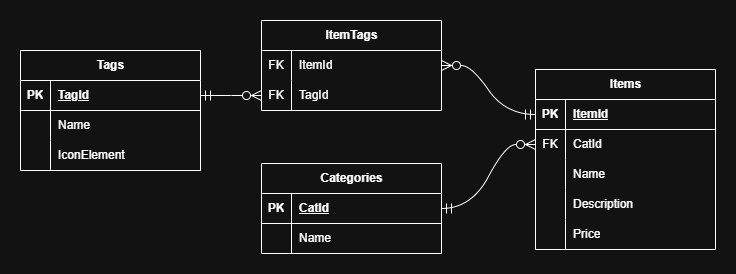
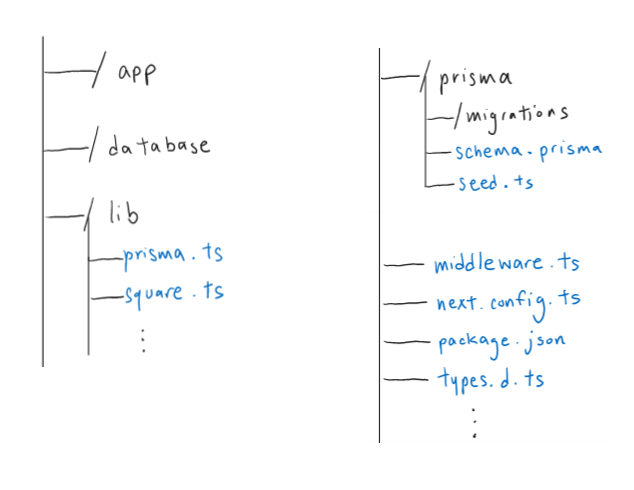
First, I established the prisma database using a free Neon Postgres project database. I translated the previous json database into its own schema:
// schema.prisma
model MenuCategory { // define MenuCategory
  id              Int         @id @default(autoincrement())
  name            String
  description     String?
  list            Item[]      // each menu category has a list of items
}

model MenuItem { // define MenuItem
  itemId          String      @id @unique
  name            String
  description     String
  price           Float
  tags            ItemTag[]
  img             String
  catId           Int         // each menu item belongs to a menu category
  archived        Boolean     // if the item is curently unavailable (Square allows an item to be "archived")
  menuCategory    MenuCategory @relation(fields: [catId], references: [id])
}

model Tag { // define Tag
  tagId       String      @id @unique
  icon        String?     // html code for a display icon
  items       ItemTag[]
}

model ItemTag { // help define many-to-many relationship
  id          Int         @id @default(autoincrement())
  itemId      String?
  tagId       String?
  menuItem    MenuItem?   @relation(fields: [itemId], references: [itemId])
  tag         Tag?        @relation(fields: [tagId], references: [tagId])
}
To maintain a user's shopping cart information, I learned how to read and write information about a user session using cookie-based authentication.
Websites use "tokens" for user authentication (e.g. OAuth, Auth0) and access to protected resources, and overall improve the ecommerce user journey. A token acts as a credential saved as a HTTP cookie that contains a set amount of user information required to determine the user's identity or authorize actions.
Credits to the Refresh Token Flow article by SecureAuth for helping me understand the process with access and refresh tokens. With the usage of tokens, the web application could maintain a user's shopping cart by saving an access token as a cookie. This access token is connected to a user's session stored in the Neon database. When a page is loaded, the shopping cart information is retrieved in the background.
// schema.prisma
model Session {
  refreshToken  String     @id @unique      // refresh token
  accessToken   String     @unique          // access token
  accessExpired Boolean    @default(false)  // if the access token is expired or not
  expiryDate    DateTime                    // session expiry date
  cartItems     CartItem[]                  // list of items in the shopping cart
  orders        Order[]                     // Orders associated with the user
}
Now, I can define the eccomerce products, cart items and orders.
// schema.prisma
model ProductCategory { // define ProductCategory
  id          String        @id @unique
  name        String
  description String?
  list        ProductItem[]
}

model ProductItem { // define ProductItem
  id              String          @id @unique   // Square Item id
  productId       String          @unique       // e.g. "matcha-latte"
  cartItems       CartItem[]
  catId           String
  productCategory ProductCategory @relation(fields: [catId], references: [id])
}

model CartItem { // define CartItem
  id             String      @id @unique @default(uuid())
  quantity       Int
  productId      String
  indexVariation Int         // index number of the Square product variation
  indexModifiers Int[]       // list of index numbers of the Square product modifiers
  refreshToken   String
  addedAt        DateTime    @default(now())
  updatedAt      DateTime?
  productItem    ProductItem @relation(fields: [productId], references: [productId])
  session        Session     @relation(fields: [refreshToken], references: [refreshToken], onDelete: Cascade)

  @@unique([refreshToken, productId, indexVariation, indexModifiers]) // ensures a unique combination of cart and product
}

model Order { // define Order
  orderId      String   @id @unique     // Square Order id
  iKey         String                   // idempotency key
  SPL_id       String   @unique         // Square Payment Link id
  SPL_url      String                   // Square Payment Link url
  totalAmount  Float                    // Square Order total amount (Canadian dollars)
  status       String                   // Square Order fulfillment status
  refreshToken String
  session      Session  @relation(fields: [refreshToken], references: [refreshToken], onDelete: Cascade)
  createdAt    DateTime @default(now())
  updatedAt    DateTime @updatedAt
}
Utilizing the Square Developer platform, I made a new account to learn about the different APIs and test the relevant functionalities with the Square Sandbox environment.
- API Explorer
- Best Practices for Collecting Information
- [Discussion Forum] Authorizing Users and connecting to Square API Customer Object
- Handling Errors
- shop products
- placing an order
- fulfil an order via a Square payment link
Figma's FigJam feature served as a great tool for brainstorming. Feel free to browse around my FigJam file with the embedded Figma component above! It includes my inital frontend brainstorm, as well as several user flow charts for various user actions.
With the addition of an ecommerce section, I adjusted the frontend file architecture to include route groups for better organization. The base pages like /about and /menu were grouped in /(market). All the /shop pages were grouped in /(shop).
Because my free project database has a limit, the database is only used for getting a simplified list of items and modifying session data. I store all information regarding the products on Square, such that retrieving a Square product will contain all information necessary to make a purchase of said product.
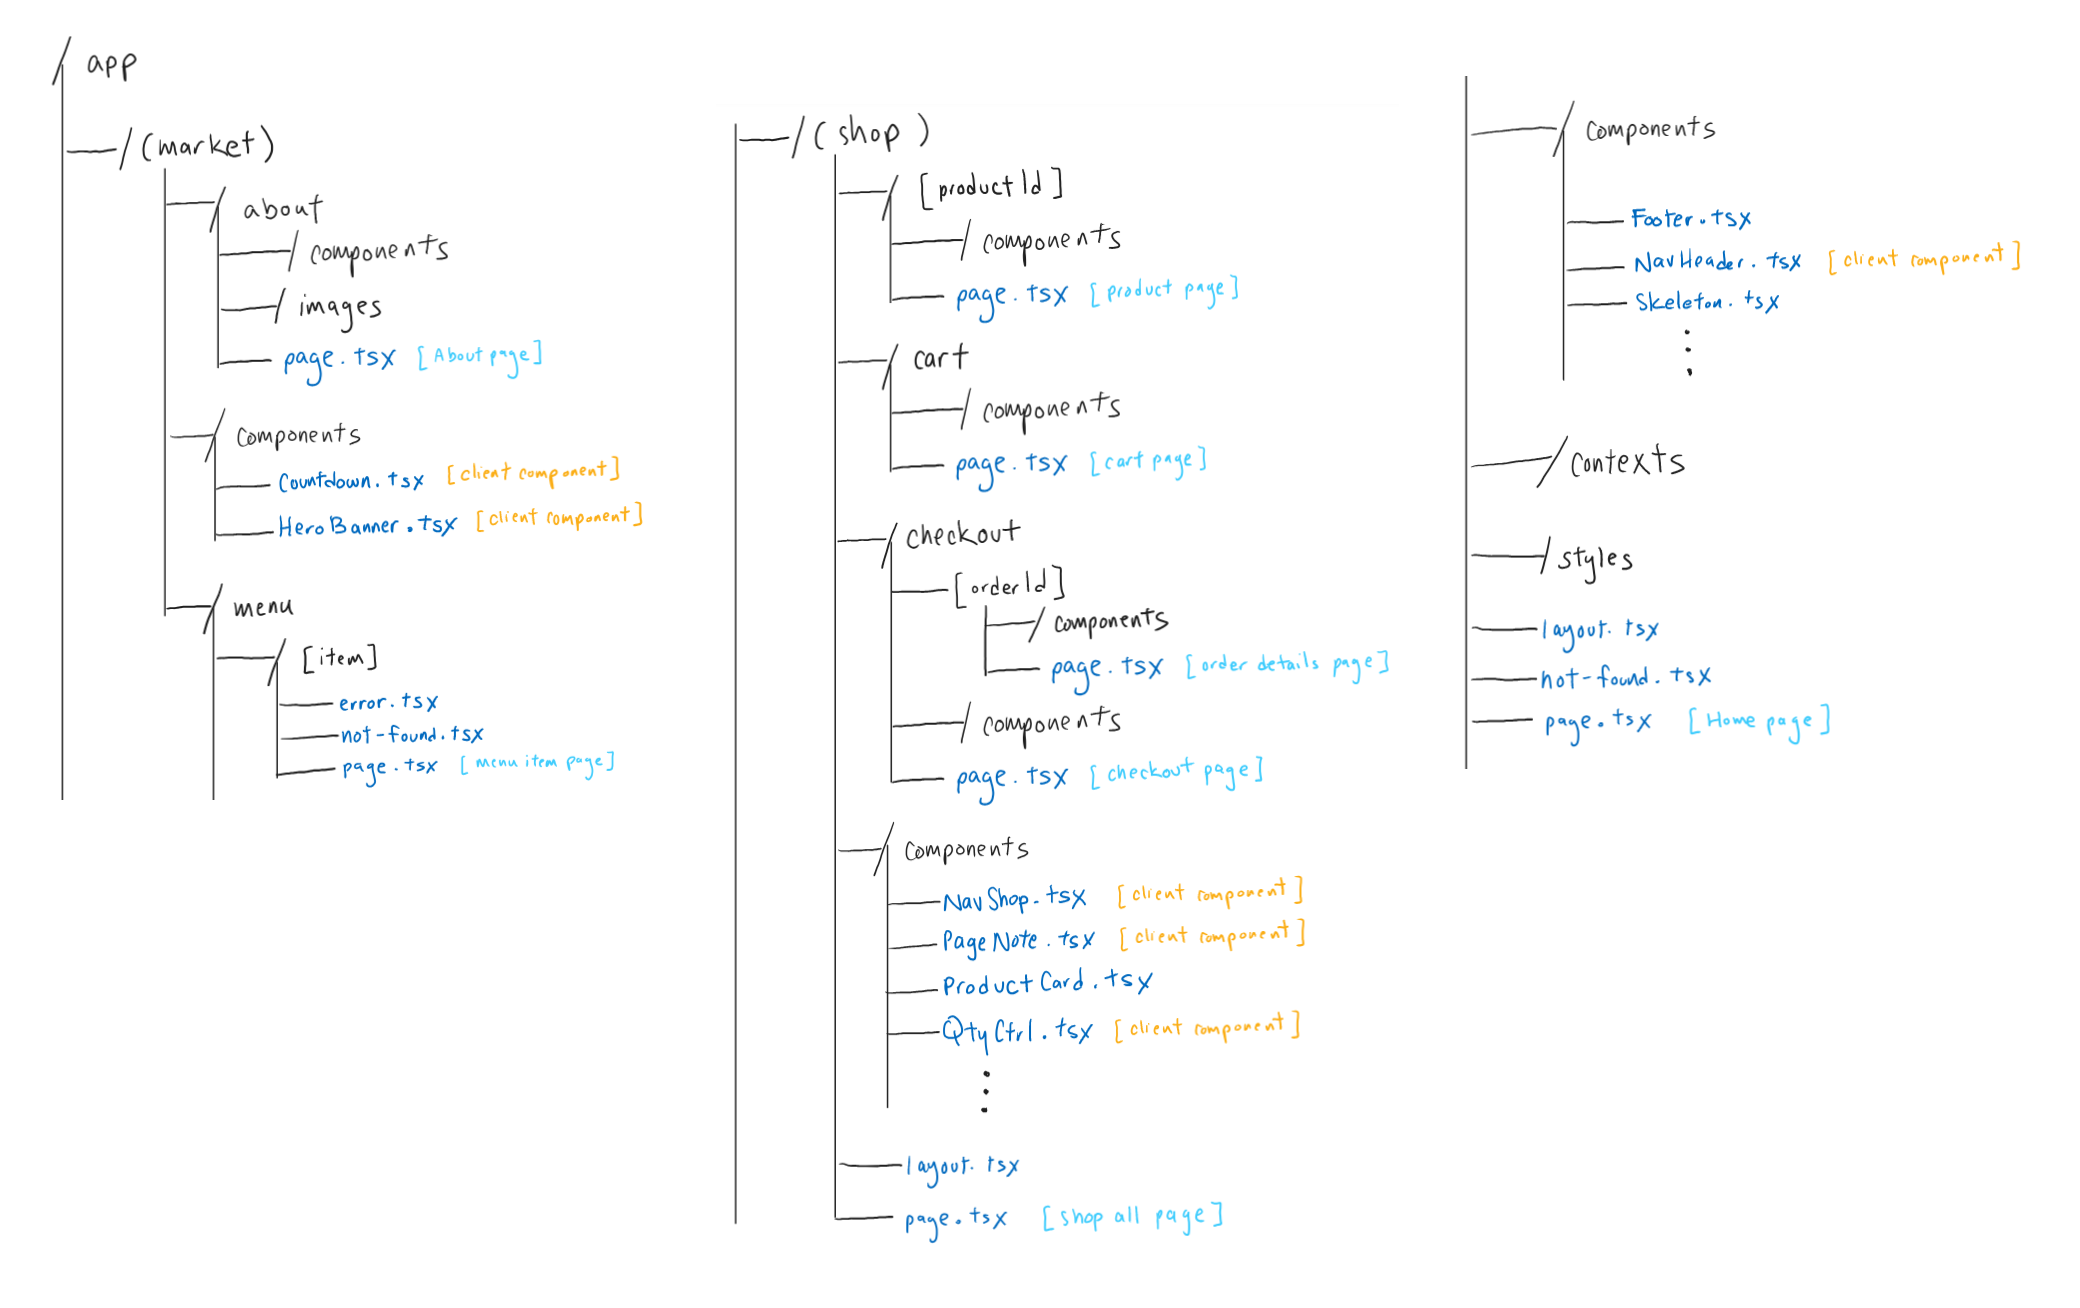
The new /shop routes:
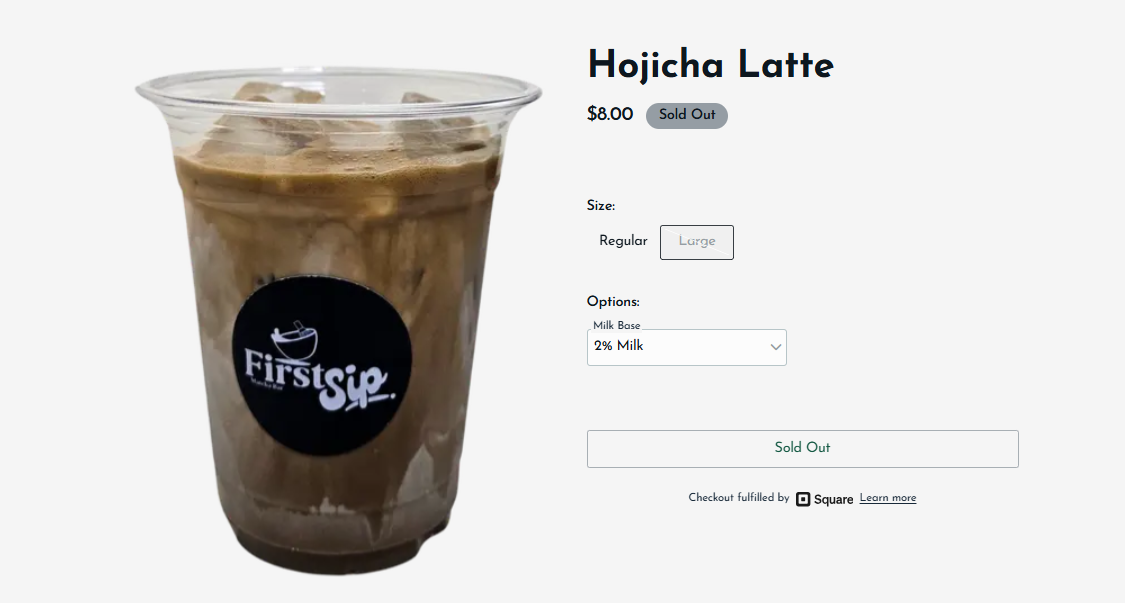
/shop: page showcasing all sellable products/shop/[productId]: individual product page- contains information about the product (e.g. price, description, related products)
- contains product modifiers and variations (e.g. size selection)
- contains quantity selection & button to add the product to the user's shopping cart
/shop/cart: shopping cart page- displays list of cart items
- can modify each cart item (e.g. adjust quantity, remove from cart)
- contains button to proceed to checkout (i.e. place an order)
/shop/checkout: checkout page- navigated here after successfully generating an order
- route only reachable from
/shop/cart; otherwise, redirect to/shop/cart
/shop/checkout/[orderId]: page for a successful order fulfillment with SquareorderId: the ID of the order generated by Square- redirected here from a payment link after the order has been fulfilled with Square (i.e. user pays for the order)
- route only reachable if there exists an order with the associated
orderIdand the order has been fulfilled; otherwise, redirect to/shop/cart
🛒 Building the Ecommerce Journey
After setting up my Square account and creating a product catalog for all the existing menu items, I built custom functions to utilize the Square APIs with the Square TypeScript library.
// prisma.ts
let PRISMA: PrismaClient;

if (process.env.NODE_ENV === 'production') {
  PRISMA = new PrismaClient();
} else {
  if (!global.PRISMA) {
    global.PRISMA = new PrismaClient();
  }
  PRISMA = global.PRISMA;
}

export const getMenu = async() => {
  return await PRISMA.menuItem.findMany();
};

export const getMenuItem = async(id: string) => {
  return await PRISMA.menuItem.findFirst({
    where: { itemId: id },
  });
};

export const getShop = async() => {
  return await PRISMA.productItem.findMany();
};

export const getProductItem = async(id: string) => {
  return await PRISMA.productItem.findFirst({
    where: { productId: id },
  });
};

export const createSession = async() => {
  const newAccessToken = generateUUID(); // generates a random UUID string
  const newRefreshToken = generateUUID();
  const newExpiryDate = new Date(Date.now() + EXPIRY_DURATION);
  const cart: SquareCartItem[] = [];

  try{
    await PRISMA.session.create({
      data: {
        refreshToken: newRefreshToken,
        accessToken: newAccessToken,
        expiryDate: newExpiryDate,
      },
    });
    return { newAccessToken, newRefreshToken, newExpiryDate, cart };
  } catch(e){ console.log(e); return undefined; }
}
// ...
// square.ts
// "Sandbox" is the term used for Square's developer testing playground
const SQUARE = new SquareClient({
  token: process.env.NEXT_PUBLIC_SQUARE_SANDBOX_ACCESS_TOKEN,
  environment: SquareEnvironment.Sandbox,
});

// Square uses type BigInt for price and money
(BigInt.prototype as any).toJSON = function () {
  return Number(this);
};

export const getCatalogShop = async() => {
  // returns all sellable products in the shop
}

// CatalogObject
export const getCatalogItem = async(id: string) => {
  // returns the product with the associated id
}
And so, server components can utilize these server functions.
/menu/page.tsx:await getMenu();/menu/[itemId]/page.tsx:await getMenuItem(itemId);/shop/page.tsx:await getCatalogShop();/shop/[productId]/page.tsx:await getCatalogItem(productId);
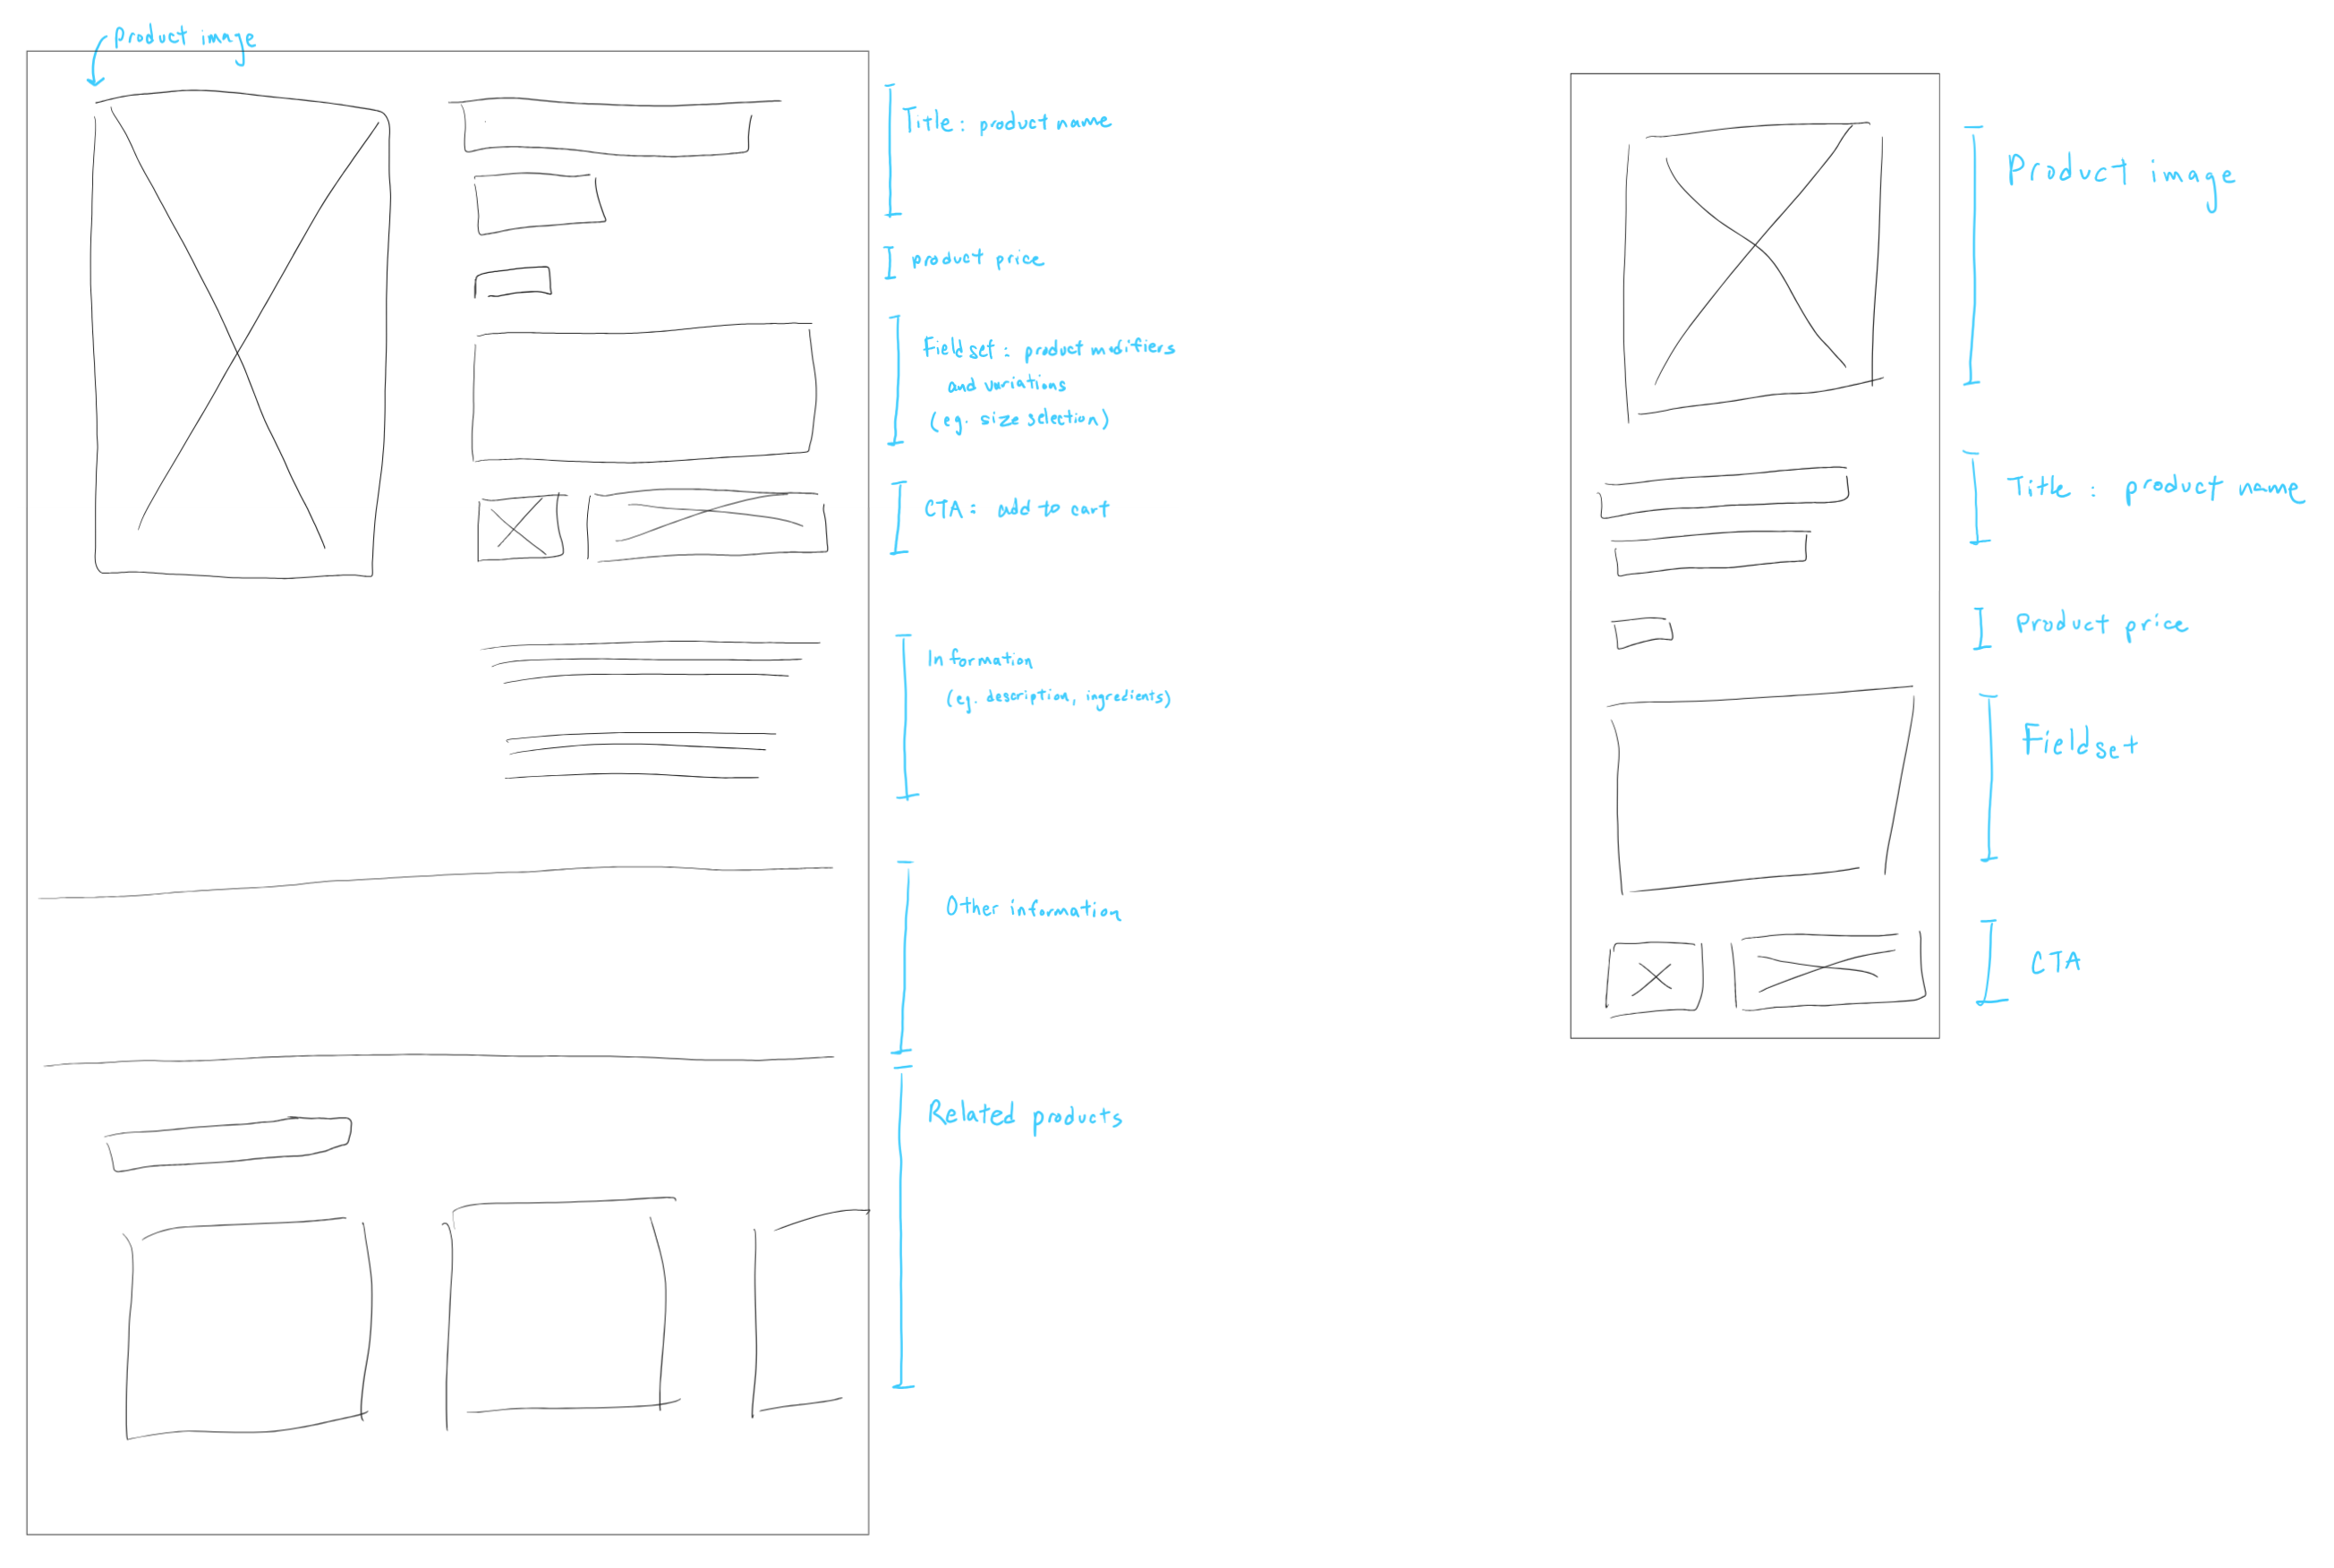
/shop/matcha-latte
- Left: page layout for larger device sizes
- Right: page layout for smaller device sizes
![A sketch of the CTA of /shop/[productId].](/images/portfolio/firstsipmatcha-fullstack/shop-quantity-control.png)
- Left:
QtyCtrl.tsx, client component that controls the quantity based on user inputs - Right: Add to Cart button, which calls a method to add the current product and the quantity desired to the session shopping cart
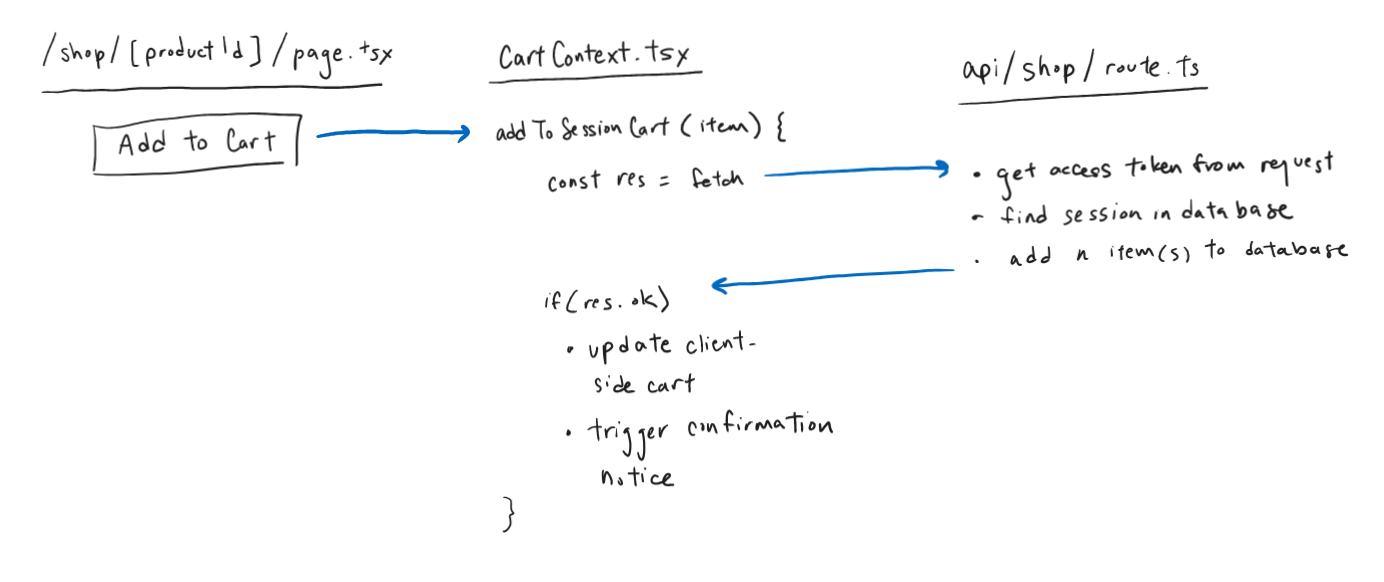
To share the state of the session shopping cart, I used React Context for State Management.
// CartContext.tsx
const initialState: CartContextState = {
  cart: undefined,
  error: null,
}

// React useReducer
const reducer = (state: any, action: any) => { ... }

export const CartProvider = ({ children }: Readonly<{ children: React.ReactNode }>) => {
  const [state, dispatch] = useReducer(reducer, initialState);
  const [isPending, startTransition] = useTransition();
  const router = useRouter();

  useEffect(() => {
    init_context();
  }, []);

  const init_context = () => {
    startTransition(async() => {
      const res = await fetch(`/api/shop`, {
        method: 'GET',
        headers: {
          'Content-Type': 'application/json',
        }
      });

      if(res.ok){
        const data = await res.json();
        dispatch({
          type: DispatchActionType.INITIALIZE,
          payload: data,
        });
      }
    });
  }

  // add a product to the shopping cart
  const addToSessionCart = (item: SessionCartItem) => {
    startTransition(async() => {
      const res = await fetch('/api/shop', {
        method: 'POST',
        headers: {
          'Content-Type': 'application/json',
          'Accept': 'application/json',
        },
        body: JSON.stringify({
          item: item,
        }),
      });

      if(res.ok){
        dispatch({
          type: DispatchActionType.ADD_ITEM,
          payload: item,
        });

        pageNoteDispatch({
          type: DispatchActionType.SET_CART_CONFIRMATION,
          payload: item,
        });
      } else{
        // display error
      }
    });
  }

  // update the quantity of a product in the shopping cart
  const updateQuantitySessionCart = (item: SessionCartItem, quantity: number) => { ... }

  // remove the product from the shopping cart
  const removeFromSessionCart = (items: SessionCartItem[]) => { ... }

  // ...
}

export const useCart = () => {
  const context = useContext(CartContext);

  if (!context) {
    throw new Error("useCart must be used within a CartProvider");
  }
  return context;
};

// ...
The state is used in a navigation component for /shop routes. This is a secondary navigation header located at the top of the page below the primary navigation header.
This secondary navigation contains breadcrumbs and a link to the shopping cart. The link has the appearance of a button, and visually contains a shopping bag icon.

/shop pages, includes: breadcrumbs and a link to the shopping cart
/shop/cart
- Left: page layout for larger device sizes
- Right: page layout for smaller device sizes
Pages like /shop, /shop/[productId] and /shop/cart can receive updates to their content. For example, if a product was recently sold out, the corresponding pages should automatically reflect the updated information..
This is achieved through incremental static regeneration (ISR), the ability to update content without rebuilding or redeploying the entire website. Because the pages are pulling information from Square, all ecommerce information can be directly managed on Square. After an increment amount of time, a page will generate a new version and invalidate the old cached version.
ISR will also allow fewer requests made to both Square and the external database by using cached versions.
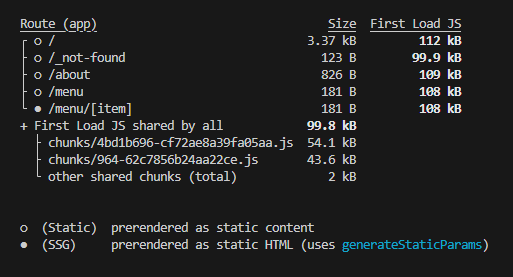
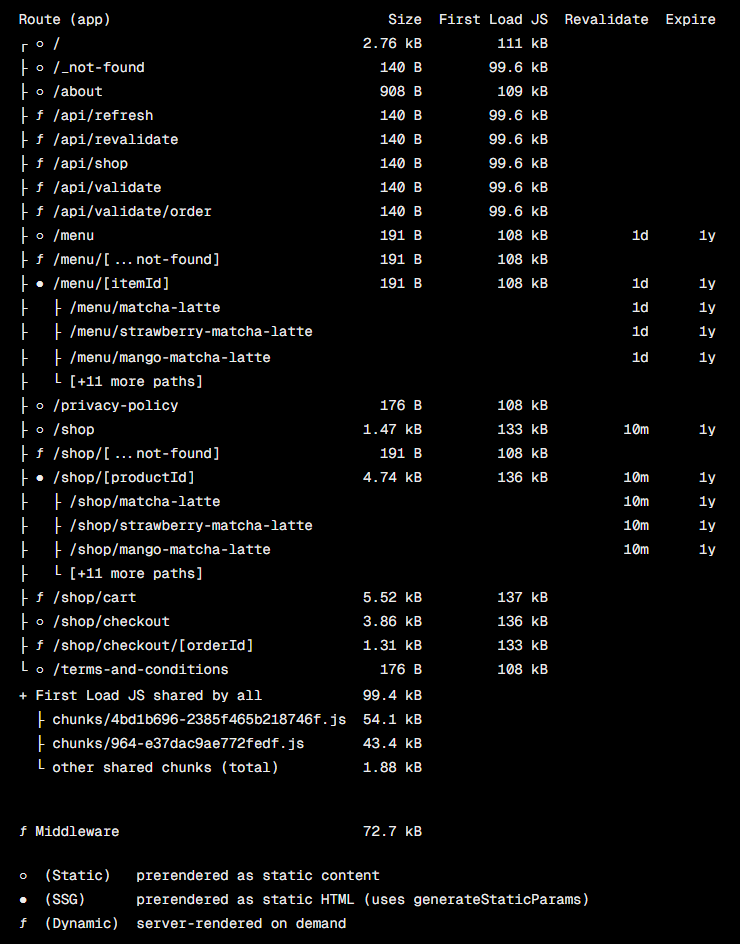
/menu:export const revalidate = 86400, 86400 seconds = 1 day/menu/[itemId]:export const revalidate = 86400/shop:export const revalidate = 600, 600 seconds = 10 minutes/shop/[productId]:export const revalidate = 600/shop/cart:next: { revalidate: 200 }, insidefetch
🚧 Middleware & REST API
The Middleware is used to protect routes and verify the user session data. For the /shop routes, the user session should be maintained (i.e. should always exist a session cookie, refresh session data if needed). For a specific path like /shop/checkout, the route should not be accessed unless coming from /shop/cart.
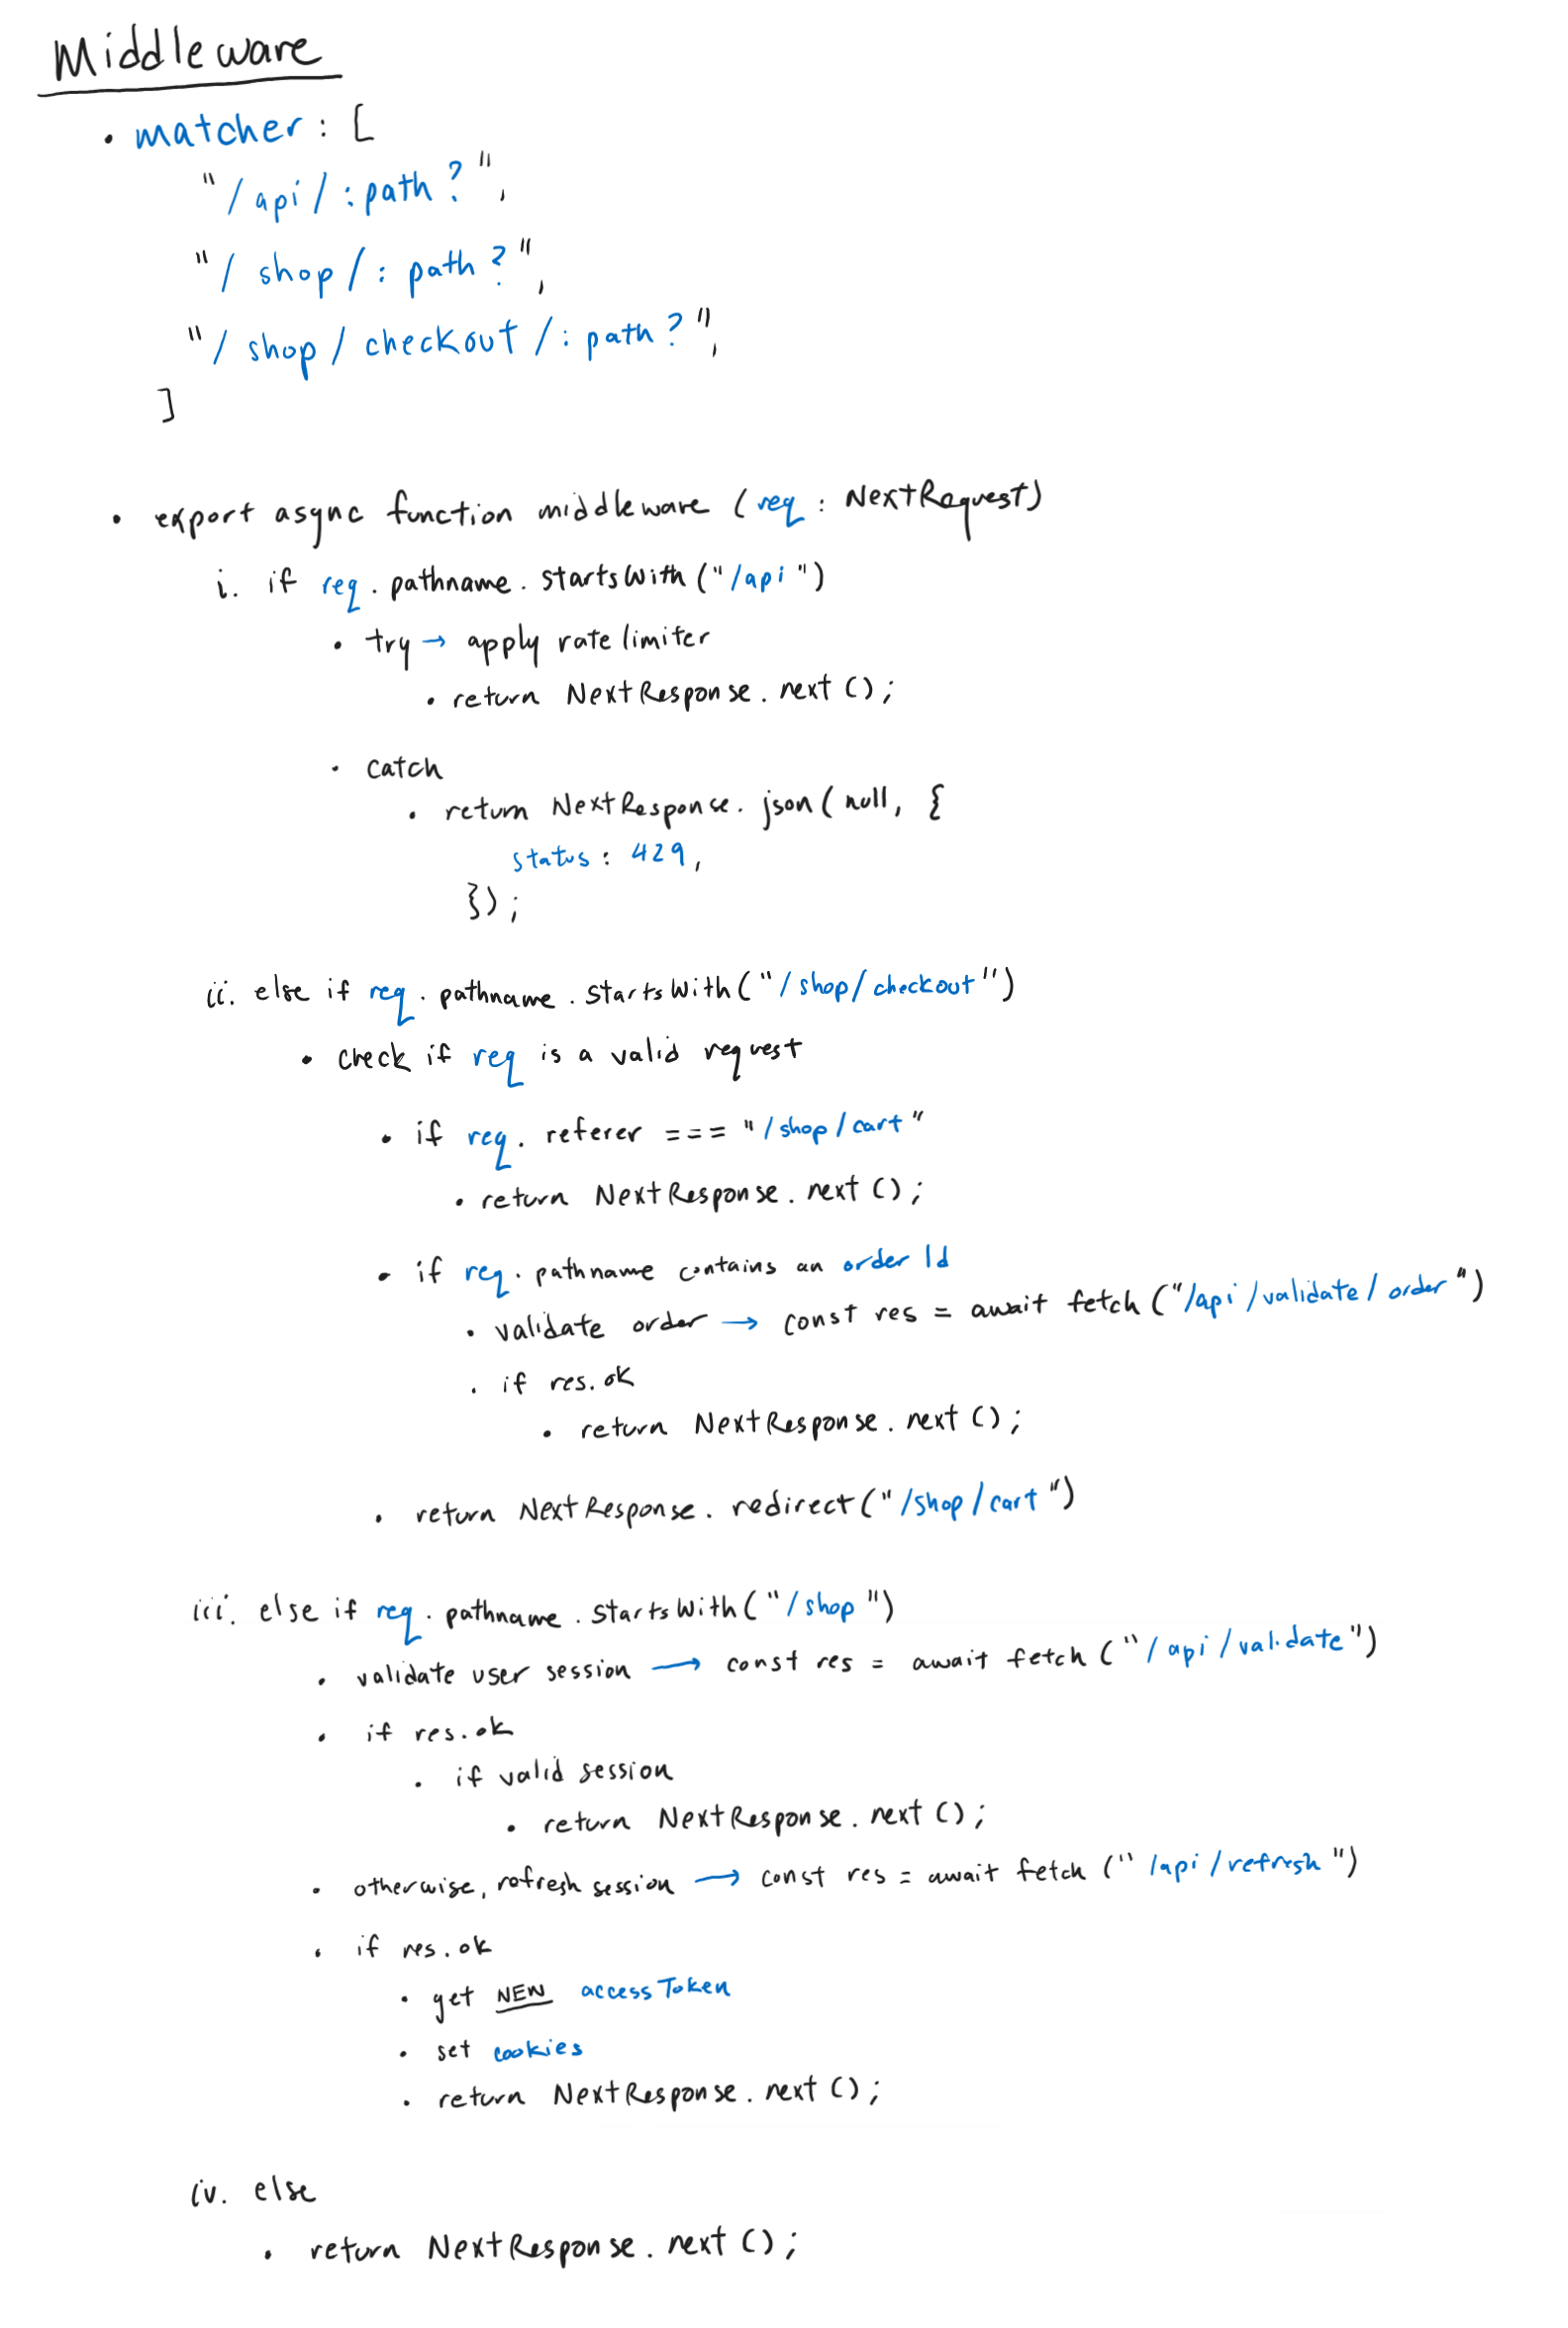
matcher: array of paths for the middleware to run on
- check if the current path is a request for an API route
- otherwise, if the current path starts with
/shop/checkout - otherwise, if the current path starts with
/shop - otherwise, continue
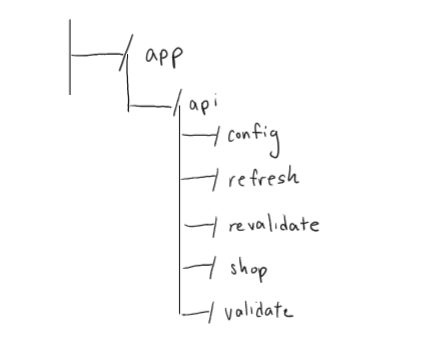
/api/config: custom rate limiter of the entire web application- using the rate-limiter-flexible library
- applies rate limit to
fetchcalls and server actions - applies rate limit to
fetchcalls and server actions - used in
middleware.ts
/api/refresh: POST route to refresh session token data- e.g. if the user session or
accessTokenhas expired
- e.g. if the user session or
/api/revalidate: GET route to on-demand invalidate cached data for the given current page, path or tag/api/shop:- GET route to obtain session data (i.e. shopping cart)
- POST route to update session data (i.e. add, update or remove from shopping cart)
/api/validate: GET route to validate session token data/api/validate/order: PUT route to validate or update an Order
The choice to apply a custom rate limiter was inspired by Square's rate limiting errors article. In the event my application gets rate limited due to sending a high number of requests to the Square APIs (which should not happen if my application is not being used on a large scale), I modified my algorithms to accommodate for errors with a 429 status code.
The article suggested "a retry mechanism with an exponential backoff schedule to resend the requests at an increasingly slower rate." For every request, it is called from inside a loop with a maximum number of total tries. If a 429 error is returned, retry the request after a delay. If the total number of attempts was reached, then we can return the rate limited error.
// square.ts
const fetchSquareObject = async(...) => {
  const baseDelay = 1000; // 1 second
  let attempt = 0;

  while(attempt <= SQUARE_ATTEMPT_LIMIT){
    let res;
    try{
      // request Square API
      return NextResponse.json(res, { status: 200 });
    }
    catch(e){
      if(e.statusCode === 429){
        attempt++;

        if(attempt > SQUARE_ATTEMPT_LIMIT){
          return NextResponse.json(null, {
            status: e.statusCode,
            statusText: e.errors.detail,
          });
        }

        const jitter = Math.random() * 500;
        const delay = baseDelay * Math.pow(2, attempt - 1) + jitter;

        await new Promise((res) => setTimeout(res, delay)); // delay
      } else { // some other error
        return NextResponse.json(null, {
          status: e.statusCode,
          statusText: e.errors ? e.errors[0].detail : e.statusText,
        });
      }
    }
  }

  return NextResponse.json(null, {
    status: 500,
    statusText: 'There was an unexpected error.',
  });
}
// ...
📊 Applying Usability Heuristics for UI Design
According to the 10 Usability Heuristics for User Interface Design by the Nielson Norman Group (NNg), appropriate communication and feedback should be presented clearly and immediately to users. Knowing the current status of a system helps users understand prior actions and determine next steps.
After adding an item to the shopping cart, I designed a passive notification as a visual confirmation of the user action. For example, the website communicates that the user attempted to add a product to the shopping cart. Initially, I debated on a persistent feedback component (i.e. permanently in view until navigating away from page) versus a disappearing overlay like a temporary popup. They both have pros and cons, however, a major drawback of disappearing feedback is it can cause cognitive load or stress for users trying to read the feedback in time.
By my own research (i.e. visiting my favourite ecommerce stores) and this cart feedback article by NNg, I chose the passive notification to be a banner that appears on top of the product page. Additionally, I added a quantity badge indicator on the cart icon on the secondary navigation component. This badge denotes the total number of distinct products in the shopping cart.
- Banner with appropriate feedback appears at top of page
- Page is automatically scrolled to the top
- Cart badge indicator is updated
For successful user actions or affirmative notices, the banner notification uses a green colour palette and usually is accompanied with a checkmark icon ✔️.
For unsuccessful user actions or alert notices, the banner notification uses a yellow-orange colour palette and usually is accompanied with an exclamation mark icon ❗.

Another method of providing sufficient communication is progress indicators, where users are able to understand that progress is being made. Specifically, I implemented visual loading skeletons as placeholders while a page or component loads. The css styling creates a subtle grey-coloured pulsating gradient.
// _skeleton.scss
@keyframes pulse { // animation
    50% {
        opacity: .5;
    }
}

.animate-pulse {
    animation: pulse 2s cubic-bezier(0.4, 0, 0.6, 1) infinite;
}
// ...
/shop page; skeleton loading component for each product
/shop/cart page with items🌐 Vercel Deployment
The new fullstack web application is now available at https://firstsipmatcha.vercel.app.
Previously, the frontend version was deployed on GitHub Pages as a static export of the web application. For simplicity and to keep my portfolio mainly on GitHub, a static export was sufficient. However, with the amount of unsupported dynamic features for static exports (e.g. ISR, cookies, middleware), it was no longer ideal to host on GitHub.
Vercel is a popular cloud platform for deploying next web applications. For a small fullstack application like mine, vercel was an easy choice as all that was required was linking to a GitHub repository (and setting up a few command lines and the environment variables).
I git push-ed the latest version to a new vercel branch of the existing repository. After testing the middleware and going through the ecommerce user journey on several devices, I am pleased to present the new fullstack application (AKA version 3.0).
💭 Next Steps
TBA